Part 2
Troubleshooting software update installation Failure – SCCM client end
How Configuration manager client works on Software updates?
The components that are required from machine’s end to receive updates are as follows:
Windows Update Agent [WUA]
-
Windows Update Agent (WUA)
Windows Update Agent (WUA) scan for the updates required and missing automatically through sccm agent, when it is connected to a Windows Server Update Services (WSUS) server or to Windows Update. Including this, WUA is also responsible for scheduling and initializing scan, detection, download, and install of updates on the client machine. WUA Agent is a default service available with operating system.
This should be available in c:\windows\system32
Configuration Manager client(CM12 client)
SCCM agent in every machine has some default client settings. It includes the following configurations:
-
Scan schedule on every machine
Schedule update deployment
-
Setting to trigger patches after deadline.
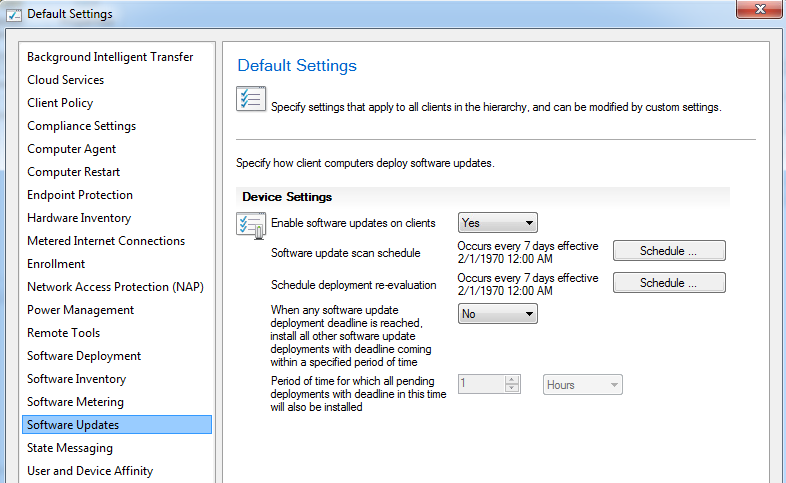
In order to apply the aforementioned configurations, the software update agent setting should be enabled as detailed subsequently. When the default client setting is enabled, a policy will be created with all required settings and stored in the SCCM SQL database. So, whenever CM12agent initiates machine policy, it will communicate with management point which includes the software update client feature installation or instructions to be installed or applied on the client. During this process, the CM12Client will create local Group policy object with WSUS settings by leaving all automatic updates.
Figure 1: Client Default setting screenshot
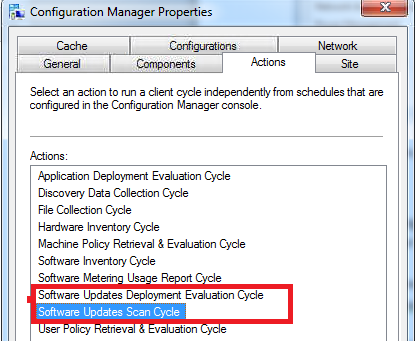
Enabling the aforementioned settings will automatically lead to installation of two action items in SCCMagent. These action items can be seen in configuration manager properties:
Software updates scan cycle
Software updates deployment Evaluation Cycle
Software Update Scan Schedule
This action performs the software update scan or compliance using the Windows Update Agent (WUA) for all updates in the WSUS catalog on the client. This activity is mostly reflected in WUAHandler.log. Once client receives the compliance info, it will save the information in WMI and forward it to site server as state message.
The scan cycle runs under the following conditions:
Whenever new deployments or active deployments available
Prior to the activation of any active deployment
After deployment, but before a reboot
After a reboot and continues with other deployments
Software Updates Deployment Evaluation
This action initiates the software update deployment to start download and install the updates. This activity is logged in Updatedeploymnet .log
Figure 2: Configuration Manger Action tab
The analysis of patch installation failures
Following questions are repeated often:
Machines unable to install updates but able to install packages and Applications
Client unable to detect software updates
Clients unable to receive only selective updates
Software updates failing to install
Before proceeding with step by step process, just make sure the logs that will be useful to identify the patch process.
-
This is the first or initial log that has to be analyzed to check whether the client detects the correct software update point as per the environment. This Log also helps to identify the distribution and management point of the client. Check for the log entry like WSUS path and the port that has been delegated for to connect WSUS. If you find any problem in seeing such entry, just double check the supsetup.log and WCM.log from server side, so that you can get some clue. If you are able to see such entries, then you are good to go with update deployment logs.
WSUS Path='http://WSUS(SUP)ServerName:8530',
Figure 3: locationservices.log
-
WUA Handler is the process initiated by Windows update agent for initiating the software update scan cycle.
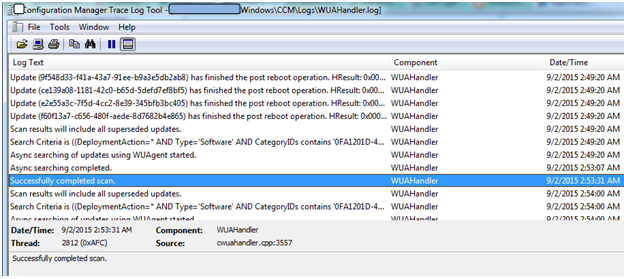
When the software update scan cycle is initiated, Windows update agent (windows update service) will contact WSUS, where you have installed SUP site role, for scanning. If it is successful, a state message will be sent to site server confirming that software update scan is completed successfully and it can be verified using the following log.
The log entry successfully completed scan indicates that scanning process is completed by update scan cycle.
If the scan is successful as highlighted in the aforementioned logs, proceed with update Deployment.log ,else proceed with verifying windowsUpdate.log . This is a system log and not related with sccm client.
-
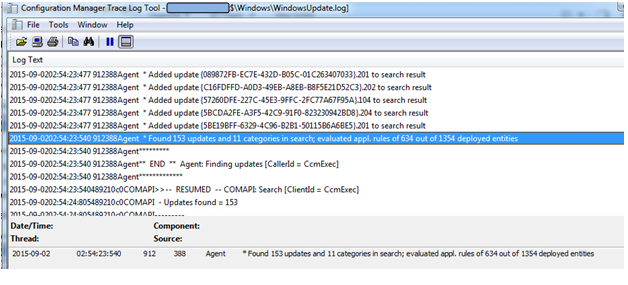
This log provides information about the Windows Update Agent that connects to the WSUS server and retrieves the software updates for compliance assessment and whether there are updates to the agent components. If there are no issues in wuahandler.log, then the updates count, rules and deployed entities are as displayed in following logs in parallel with updatedeploymnet.log (refer to page4).
The log path, c:\windows\windowsupdate.log
In some cases, when the scan is not completed in wuahandler, there may be a possibility that WSUS entries are not set correctly or have issues in locating the correct WSUS server. In this case, the WSUS entry can be set manually. Here, the WSUS entry is nothing but the correct server name and the port.
The registry location for the WSUS entries as follows:
HKLM\SOFTWARE\Policies\Microsoft\Windows\WindowsUpdate
HKEY_LOCAL_MACHINE\SOFTWARE\Policies\Microsoft\Windows\WindowsUpdate\AU withUseWUSserver =1
Most of the software update scan failures will be due to the health of Windows update service. This service needs to be up and running for the smooth software update deployment process.
Figure 5: WindowsUpdate.log
-
This log provides information about software update deployment, deadline and enforcement details. It also shows the information about the total number of updates being targeted to the machine and the status of those deployments. Any user defined service window and the status of the deployment that is assigned to run at service maintenance window can be viewed. The availability and the status of the updates that are pending for reboot are also viewed using this log.
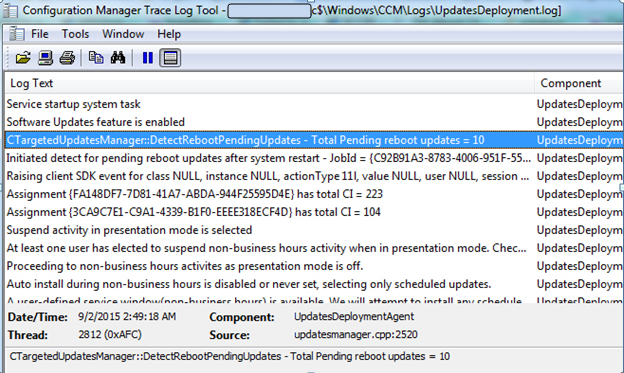
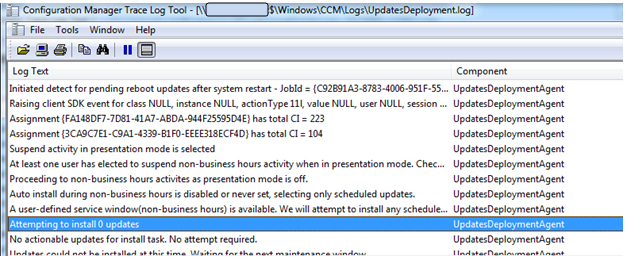
In the following two log snippets, many entries can be noticed:
Assignment {3CA9C7E1-C9A1-4339-B1F0-EEEE318ECF4D} has total CI = 104 UpdatesDeploymentAgent 9/2/2015 2:49:20 AM 2812 (0x0AFC)
The log entry shows the assignment id that has total CI =104, it means that assignment ID {3CA9C7E1-C9A1-4339-B1F0-EEEE318ECF4D} has 104 patches assigned to it.
Attempting to install 0 updates UpdatesDeploymentAgent 9/2/2015 2:49:20 AM 2812 (0x0AFC)
No actionable updates for install task. No attempt required. UpdatesDeploymentAgent 9/2/2015 2:49:20 AM 2812 (0x0AFC)
The log entries show that the client doesn’t have any actionable updates to install.
If it is found that all deployments are installed and there are no actionable updates for install task, please proceed with step 5, which is, verifying updatestore.log
If the newly added patches are not installing, then the updatedeployment.log should be viewed for the particular assignment group and patch count. If the count of patches are less than what it is supposed to be, perform the following tasks:
-
initiate software update scan
If there are some updates pending for action (total actionable updates <>0) but not installing, perform the following tasks:
Check for the DP assignment
Check for content availability
Check for content download in CAS.log
Continue with as usual package download issue that is followed during the Application or package deployment.
Figure 6: UpdateDeploym,ent.log1
Figure 7: UpdateDeployment.log2
-
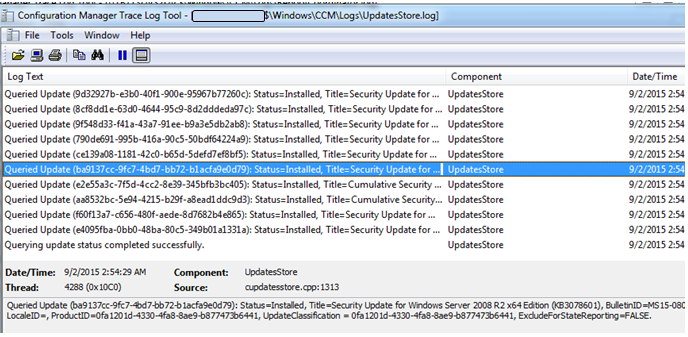
This log states that the information about the compliance status for the software updates were assessed during the compliance scan cycle. There is different compliance statuses like missed, Installed, Not Installed and so on. So for each update, the compliance status can be verified at last.
For example, in the following screenshot one of the security update status can be noticed:
Queried Update (ba9137cc-9fc7-4bd7-bb72-b1acfa9e0d79): Status=Installed, Title=Security Update for Windows Server 2008 R2 x64 Edition (KB3078601), BulletinID=MS15-080, QNumbers=3078601, LocaleID=, ProductID=0fa1201d-4330-4fa8-8ae9-b877473b6441, UpdateClassification = 0fa1201d-4330-4fa8-8ae9-b877473b6441, ExcludeForStateReporting=FALSE.
If everything is going good, then the final log to refer to is RebootCoordinator.log
This log provides information about the process for coordinating system restarts on client computers after software update installations.
Figure 8: updatestore.log
 04:10:00










 Posts
Posts



