There are multiple documents and online blogs available to explain step by step process of installing SCCM, so I decided to give unique documents for the purpose of learning, which includes explanation of each and every task performed during the SCCM installation and background of the component and process involved during implementation. In this document I have explained about prerequisite to be installed before setting up SCCM environment.
- Extending Active Directory Schema
- Creation of system Management container in AD
- Delegate Control for system Management container
- Enabling roles and features required for SCCM
- Installing Windows Automated Deployment Toolkit
Part 1: Extending Active Directory Schema
Why Schema Extension Needed?
Extending Schema is the forest wide action and executed one time per forest. Schema extension is possible only by the member of Schema admin group. In order to extend schema the user must be part of schema admin group. Schema extension adds some specific attributes and classes, so that any configuration manager site part of the Active directory forest can use .We can extend the AD schema before or after running the SCCM setup.
Most of the Features of Configuration Manager depends on Schema extension. Some of the features are listed below for your reference- Automatic Site assignment during client install
- Client to server Port configuration
- Network Access Protection
Verifying a trusted resource and Global Roaming
Some of the Attributes and Classes Added by the Configuration Manager Schema Extensions
Attributes:
cn=mS-SMS-Assignment-Site-Code
cn=mS-SMS-Capabilities
cn=MS-SMS-Default-MP
cn=mS-SMS-Device-Management-Point
cn=mS-SMS-Health-State
cn=MS-SMS-MP-Address
cn=MS-SMS-MP-Name
cn=MS-SMS-Ranged-IP-High
cn=MS-SMS-Ranged-IP-Low
cn=MS-SMS-Roaming-Boundaries
cn=MS-SMS-Site-Boundaries
cn=MS-SMS-Site-Code
cn=mS-SMS-Source-Forest
cn=mS-SMS-Version
Classes:
cn=MS-SMS-Management-Point
cn=MS-SMS-Roaming-Boundary-Range
cn=MS-SMS-Server-Locator-Point
cn=MS-SMS-Site
All the attributes and classes used by previous version is not needed or supported in configuration Manager 2012, for example,
Attribute: cn=MS-SMS-Site-Boundaries
Class: cn=MS-SMS-Server-Locator-Point
How to Extend Schema?
Two ways to extend,
One is right clicking the extadsch tool and executing it as administrator.
Note: To execute the extadsch tool successfully, the user should be member of schema admin group.
You should be able to find extadsch.exe tool with SCCM Suite (SMSSetup\BIN\X64 )

Second way is to open the command prompt with any of the user, member of schema admin group and navigate to the path of extadsch tool and execute it.

You should be able to view successful message as mentioned in above figure. At the same time , you can double check with the ExtADsch.log that will be generated during extension and available in C-drive.

Part 2 :Creation of System Management Container
Why System Management Container needed?
After extending the schema, the site information like Service locator, boundaries, Management point information etc. are published to Active Directory domain service. So we have to create a container named System Management. SCCM site server’s computer account must be granted full control to the System Management container and all of its child objects. Each and every site publishes its own site information to the System Management container within its domain partition in the Active Directory schema.
How to create System Management Container ?
Open server Manger Dashboard → select tools -> ADSI Edit

Select Default naming Context as mentioned in the figure

Click OK
Now ADSI tool will be opened with Active Directory folders and containers.
Right click CN= Systems -> new -> Object

Select Container in create object screen

Click Next

Name the Value as System Management as mentioned in above figure
Click OK.
Part 3: Delegate Control for system Management container
Why Delegation of Access needed?
Delegation of access needed because site server cannot publish information to any active directory container by default. Without full control access for any particular OU, the site server can’t publish information. So in order to publish information, we are delegating site server account with full control to system Management Container.
You can also verify the site code object information’s by reviewing the hman.log file, and you can verify management point and server locator point information created by the site component manager by reviewing the sitecomp.log file.
How to Delegate permission to site server account?
Run DSA.msc
Or
Select Active Directory Users and Computer in Administrative tools
Right Click the Container System Management -> Delegate Control -> Next -> ok
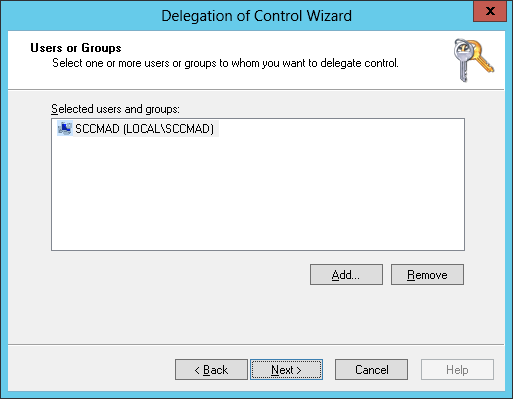
Now Delegation wizard will be opened as mentioned in the picture below

In Delegation wizard,
Select Add ->object types-> check computers -> ok

Search for the SCCM computer account and add it to delegation wizard.
As per my environment, SCCMAD is the site server computer account, so I added for the delegation as seen in below picture.
After performing these steps open the system Management Container, you should be able to see these below information’s.
SMS-Site-<site code>
SMS-MP-<site code>-<site system server name>
SMS-SLP-<site code>-<site system server name>
SMS-<site code>-<Active Directory site name or subnet>
Once added the SCCM computer account,
Click Next

Select Create a Custom task to delegate

Select option This folder, existing objects in this folder, and creation of new objects in this folder

Select all three box in “show these permissions”
Select Full control in” Permissions”
Select Next ->Finish
Now we delegated full access to the site server computer for system Management container
Thanks for reading this Post; I will continue explaining the part 4 and 5 in my later Post
Part 4 Topic
Enabling roles and features required for SCCM
Installing Windows Automated Deployment Toolkit


